This article details the editable settings once an AOD is created as well as instructions on how to edit these fields in the BlendVision AOD module.
Before we start
Before editing an AOD, please refer to the article below:
- Add an AOD for information on settings and editable settings when adding a new AOD
Start editing an AOD
Once your file(s) are uploaded for encoding, you can confirm their status and details in the AOD list.
To start editing, click on an AOD from the AOD list to access its settings page.
The following article sections will detail the editable fields for each setting group:
- General
- Security
- Status
- Subtitle
- Image
- Showroom
- Player
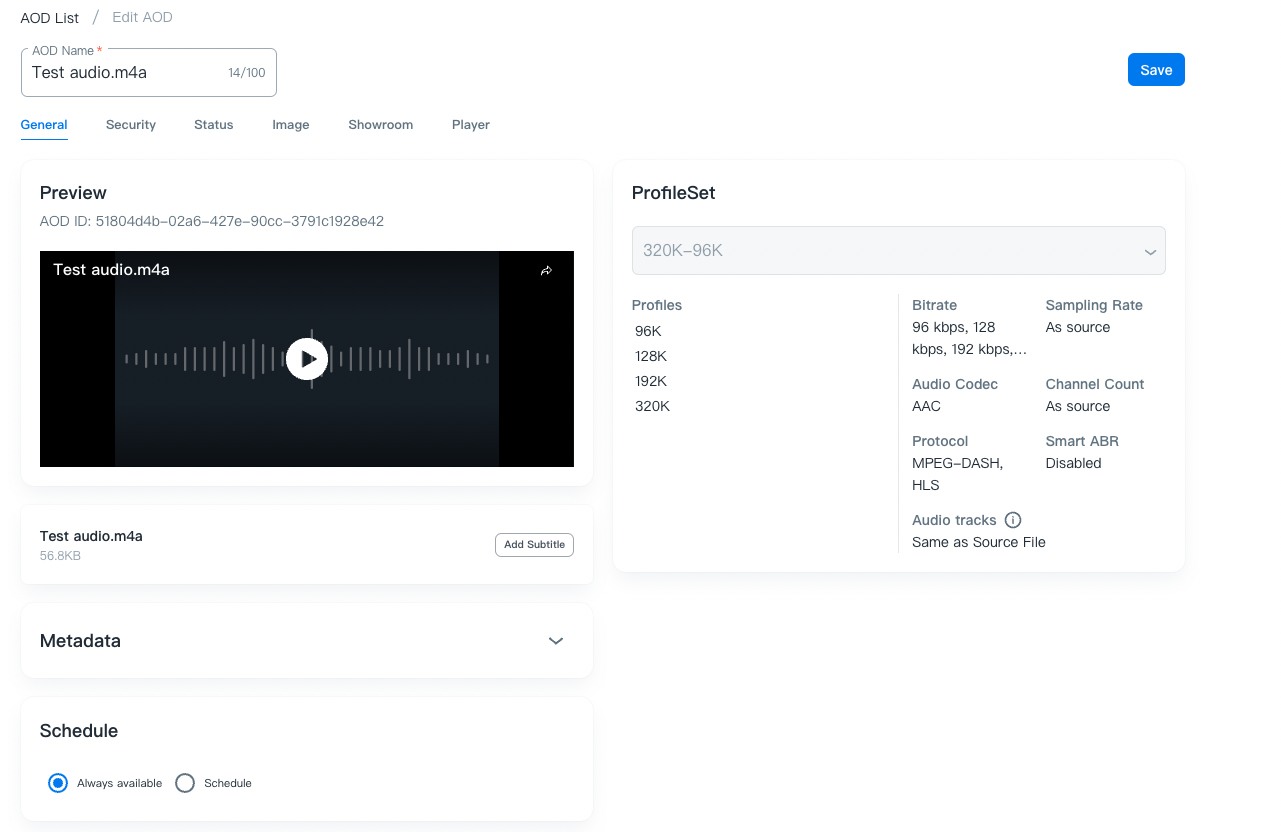
General
In the General tab, you can confirm and edit information about the encoded AOD.
Note: ProfileSet will be uneditable once the AOD is created.
AOD Name
The filename is used by default. This field can be edited.
- Max: 100 characters
Preview
-
Preview AOD Player: preview the encoded content before publishing
- AOD ID: a unique content ID
-
- Share to External Service: click share icon to share your AOD to external services
Schedule
The AOD content will be available for playback once encoding is completed. You can opt to set a specific period for playback availability.
- Always available: content will be ready to stream once encoded without time constraints.
-
Schedule: content will be streamable during the scheduled start time and end time
- Before the scheduled start time: you can switch to Always available or change the scheduled time.
- Before the scheduled end time: you can set a new end time.
Security
Once an AOD is created, the DRM and Geo-region settings in the Security tab will be uneditable.
For the definition and limitations of each setting, please refer to Set up Security Features.
Status
Each AOD encoding process will go through several stages before finishing. You can track the progress from the Status tab.
To get a quick overview of the encoding status of your AODs, you can check the Status fields shown in the AOD List.
Encoding log
This section displays each status with completion timestamps
- Ingesting: file is being transferred from user input to BlendVision’s upload storage.
- Queueing: file is queuing for encoding resources.
- Encoding: file is being encoded, transcoded, and packaged
- Deploying: file is being deployed to a CDN or to the assigned cloud storage
-
Success: file has been successfully deployed and is ready to be streamed/previewed.
- Note: some features are only available when the encoding status is “Success”.
If the encoding job fails due to an error during encoding, you can check the error message for troubleshooting advice, or contact our support team.
Source file information
This section displays the inspection results of the uploaded file configuration.
Metadata
Digest
This feature allows users to generate an AI-generated summary of the provided content to be utilized for AiSK interaction, content overview and information.
Before generating a summary, please ensure the content’s subtitles are attached first, or an error message will pop-up.
Click “Edit” button to go to Regeneration Setting for the next step.
Summary
Source Type: Select source type based on your content
- General (Default)
- Football
- E-commerce
- Meeting & Slides
- News
*If “Meeting & Slides” is selected, Additional Information will be activated and key questions/action items/decision made will be default on.
Subtitle
- List the Subtitle’s “Display Name” dropdown from Subtitle list
Output
Type
- Paragraph (Default)
- Bullet Points
Length
- Brief (Default)
- Average
- Extensive
Click Save button at the lower-right corner to generate a concise summary that you can copy for further purpose. Summary supports Traditional Chinese, English and Japanese languages.
*The AOD and Subtitle cannot be deleted during Summary generation.
Action items, key questions and decision made will be displayed when “Meeting & Slides” is selected as source type.
Transcript
This feature allows users to find the AOD information quickly where they can search the keyword within transcription.
You can use the search bar to search the keywords in the transcription.
It will display the total findings marked with yellow color and select up and down to browse the results each by each. When you click the wording, you can jump to its timestamp on the audio timeline.
There are 2 display views for the transcription, Article View and List View. The default view is Article View where you can confirm the time range of each transcription.
Click to change to List View to display the transcription only.
Metadata
-
Short description: a brief introduction of the content
- Max: 100 characters
-
Long description: detailed introduction or highlights of the content.
- Max: 2,000 characters
- The long description will be provided in the information panel of the AOD player.
-
Label: labels the content for management or filtering
- Max: 20 labels per content
You can rearrange the layout of Transcript and Digest section by clicking icon.
Subtitle
You can add or download subtitles via Upload or Auto-generated to your audio.

-
Upload from local
- Upload Subtitle with formats: .srt, .vtt
- Choose your preferred “Subtitle language”
- Input “Display Name”, and click “Add Subtitle”.
-
Auto-Generate Transcription
- Choose “Language spoken” and input “Display Name”, then click “Add Subtitle”.
Image
In the Image tab, you can edit the cover image that is shown during the unpublished period for the AOD.
Click the preview thumbnail of Image column to show the pop-up menu for editing.
4. Select the type from below 2 options, then press “Save” button to start uploading:
- As Player Template: default option. will set the black background as cover image
-
Custom: Upload an image file from local as cover image
- file format: png/jpg/jpeg
- file size: < 5 MB
- best ratio: 16:9
5. Once uploading is completed, you can confirm the preview thumbnail in Image tab.
Showroom
In the “Showroom” tab, you can edit the configurations to customize your showroom design.
- Login Page: customize the login page for your audience before they access the main page
- Main Page: customize the main page where your AOD will be displayed.
For detailed steps on how to edit showroom features and generate access codes, please refer to Set up Showroom Features for more details.
Player
In the “Player” tab, you can select the player template.
You can select your preferred template from the “Select template” drop menu. Besides, click “Expand All”, the related details of the template will be displayed.
If you want to edit templates or none of the templates meet your requirements, click “Settings” button to move to「Player Settings」page to edit templates or create a new one.
Regarding more details of template settings, please refer to Customize Player Template for more information.
Save and submit the edited results
After editing the fields above, click the “Save” button on the upper-right side of the settings page to save and submit your edits.